
Recently the RTI on my Volvo S60 started to freeze sometimes, and after some weeks, I get the message “Can not read disc” and it stoped working. As the laser unit is known as a common failure on this drives, so I ordered a new laser and follow this tutorial prepared by Ian Wilson to replace it:
Instructions for replacing the laser light in a Volvo DVD Drive
Prepared by Ian Wilson, July 2008 – may be freely copied. This guidance is offered with no warranty whatsoever. The whole process requires care and cleanliness. You undertake it at your own risk.
I have not shown the steps in removing the unit from the car because this will be unique to each model.
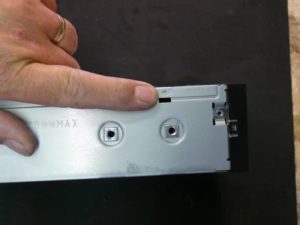
The Top cover is held by this screw
These notches can be used to prise the top cover off. Use a flat bladed screwdriver and twist – gently.
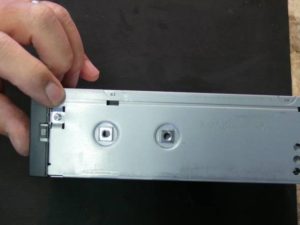
Front cover is held by these screws, one each side.
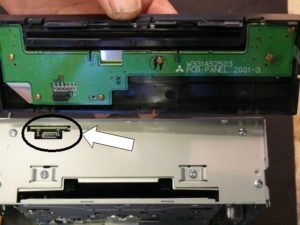
Remove the top cover.These hold the front cover. Use a small screwdriver to prise off. Care required. :
Note the small connector that connects the front cover to the chassis.
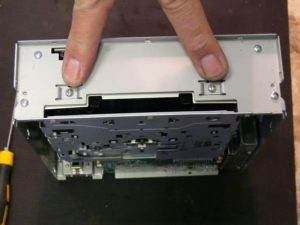
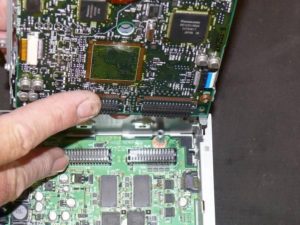
These screws need to be removed, they hold the DVD carrier to the internal chassis.
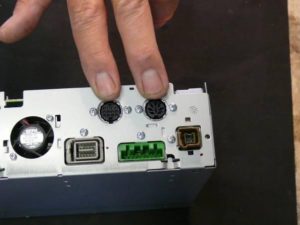
Remove these four screws. Two either side of the connectors.
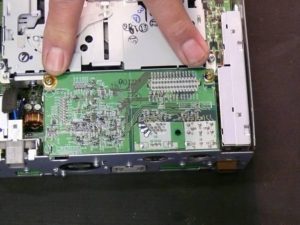
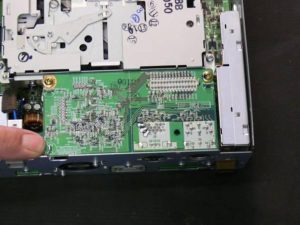
Remove these screws that hold the circuit board to the chassis. Do not remove CB yet!
Check these tabs. Mine were twisted to hold the CB. If necessary twist gently to align with the slots in the CB.
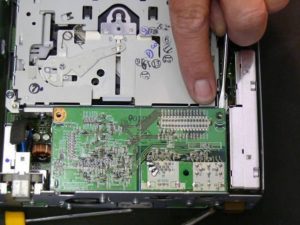
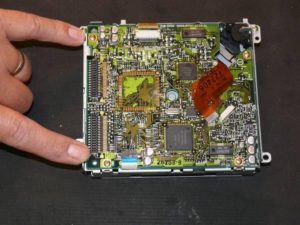
Prise the CB from the chassis from this corner. Great care is required
Here you can see the CB being removed. Note the plug connector that connects the CB to the “motherboard”.
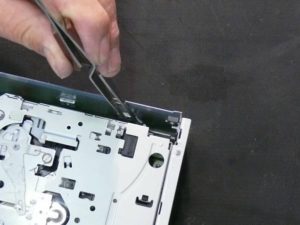
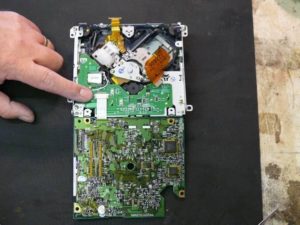
There are four screws holding the DVD mechanism to the chassis. Here you see two, there are a similar two on the other side. Remove.
Removing the screws holding the DVD mechanism. A pair of tweezers can be useful here.
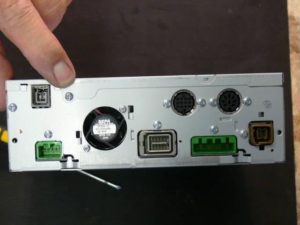
After removal of the 4 screws the DVD drive mechanism can be prsied form te chassis. There are 2 connector blocks which will unplug as you remove the mechanism. See later photograph for a view of the connector blocks.
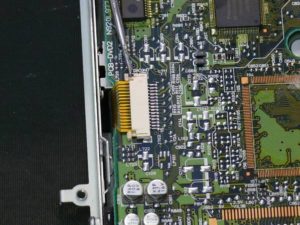
These two connectors need to be removed before the DVD circuit board can be removed from the drive mechanism.
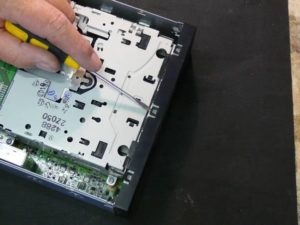
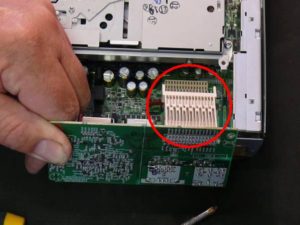
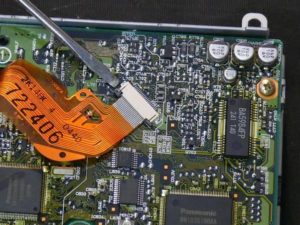
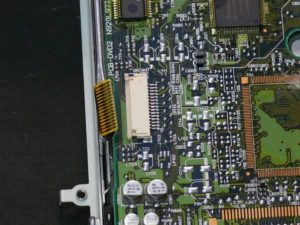
Close up view of one ribbon connector. The end of the screwdriver is pointing to the very small clamp that holds the ribbon cable. These need to be gently prised out to free the ribbon cable.
Here we have the second ribbon connector. This picture shows the ribbon clamp more clearly. It is in the “out” position ready for the ribbon cable to be removed.
Here the ribbon cable has been removed from the connector.
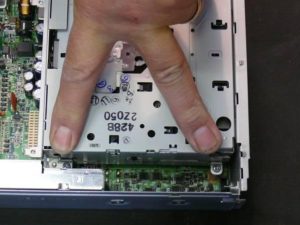
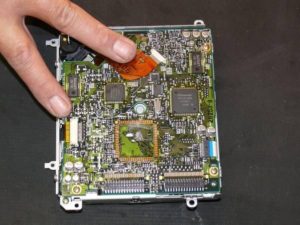
These screws hold the CB to the chassis. They must be removed.
This picture also shows the block connectors that connect the CB to the DVD drive. They can seen between my fingers.
At this stage the CB can be lifted from the drive – but take care – there is still on ribbon cable connected.
This cable has the clamp mounted on the underside of the CB, hence the CB needs to be “hinged” up to gain access to the ribbon connector – visible at the end of my finger. Remove the clamp using the same process as before. Remove the cable.
This next stage is not strictly required, however I found it easier this way and less risky.
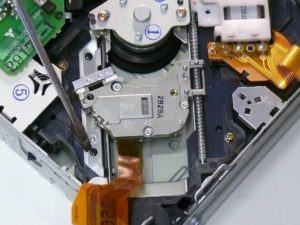
The screw indicated holds the clip that holds slide bar for the laser light. Remove the two screws (black) and lift out the clip.
Here the retaining clip for the laser unit guide bar is being removed.
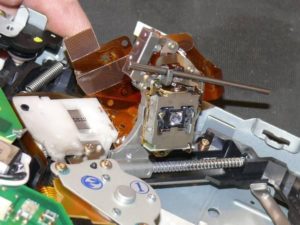
Here the laser has been lifted. The arrangement for the slide bar can be clearly seen. This picture also shows the laser light itself. If the aim is to clean the light – this can be done now, no further dismantling is required.
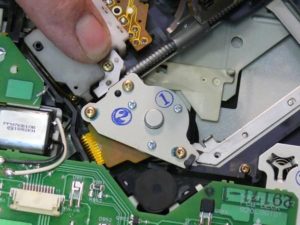
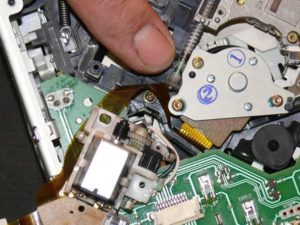
This screw holds the motor mount for the laser light. The picture clearly shows the worm drive that moves the laser light radially across the DVD.
Remove the screw.
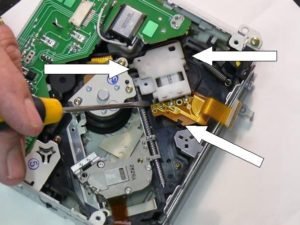
Carefully prise the motor unit from the chassis. The clips are difficult to see. I have indicated their position in the photograph.
Prise out the motor mount (care required). Note that it is still connected via a ribbon cable that I did not remove. Just gently put the motor to one side.
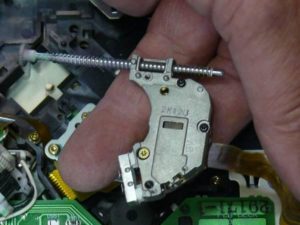
The motor mount (and motor) is clearly visible in the photograph below. Take care – the centre (white) gear has no retainer and so can drop form the mount and be easily lost.
With the motor mount removed a small clip holds the worm drive in the chassis.
And here, at last, the laser light is being lifted from the drive.
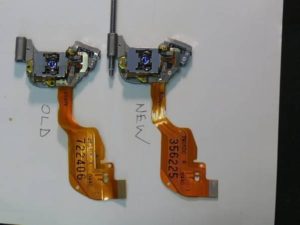
Just for the record, and to show the numbers, here are the two laser units, old and new. I have already fitted the worm gear to the new laser unit.
That’s it!
Reassembling is a reversal of this process.

The instructions in this tutorial will work in the following model years:
- 2000, 2001, 2002, 2003, 2004, 2005, 2006, 2007, 2008 and 2009 Volvo S60
- 2000, 2001, 2002, 2003, 2004, 2005, 2006 and 2007 Volvo V70
- 2000, 2001, 2002, 2003, 2004, 2005, 2006 and 2007 Volvo XC70
- 1998, 1999, 2000, 2001, 2002, 2003, 2004 and 2005 Volvo S80
- 2003, 2004, 2005, 2006, 2007, 2008, 2009, 2010, 2011, 2012, 2013 and 2014 Volvo XC90
Shaun says:
Thank you so much for taking the time to post this, very much appreciated.
david says:
Hi! I just wanted to get a post out there about the repair job I’ve just done on my GPS (volvo S60, 2003) -> for me, it wasn’t a bad laser or lens; it was the tiny motor that drives the endless screw (which in turn makes the little lens carriage move back and forth) that went bad – internal short circuit due to the torn/split brushes. I first replaced the tiny motor with the same model bought online (PPN7KB10B about 1.5 dollars on impelshop.com), but it didn’t suffice -> the shorted motor drew about 0.8 Amperes in place of 0.03 and therefore toasted its driver output. Thus i replaced the driver (the chip is BA5984FP-E2CT-ND, found on digikey for 5.5 dollars – the chip can be seen on a picture above -> search for “Close up view of one ribbon connector.”). This was a tedious and possibly destructive job, because of the 28pins + 2 thermal pads + some kind of glu they use to make the chip impervious to moisture. I broke two little land pads for two pins, so i had to make some bondings when soldering the new chip… but then i went to my car, plugged it back in and TADAAA! it works like a charm. I wouldn’t recommend this to anyone not familiar with dealing with electronics, better ask some relative or friend of a friend.
Note: this is how i diagnozed my GPS : 1/ the screen was lifting up from the dashboard as expected, and was announcing the “cannot read disc blablabla” so it wasn’t a problem of hardware logic (or power). -> i can continue looking further (if your problem is erratic behavior of the software, then you’re most probably fucked). 2/ i could hear the disk spindle on start up (quickly turn the key in first position and run to your trunk and stick your ear to the dvd thingie) and the reader would attempt several tries before stopping – it was the only motor i could hear 3/ i opened the gps and used a 5V power supply on the contact of the carriage motor (just apply wires with your hand) to make sure the motor could move, and it did, BUT once every 5 attempts and drawing a whole lotta more current than it should have.
Note 2: i simplified the process above -> if you have bad luck (as i had initially) the motor failed before the carriage could return home (there’s a little black stop switch on the travel of the carriage, near the motor for detection) and then, because the carriage can’t reach the end switch, the read disc procedure cannot start – the disc won’t spindle on start up, because carriage doesn’t return home; so don’t jump to the conclusion that the spindle motor is bad, check for the carriage position when you open it – just open the gps and unscrew the little guide joining the carriage and the endless screw, move it all the way to the end switch and try it again on your car. you should hear the spindle, and the squeaking of the carriage motor; if neither, then you can say the spindle motor or spindle driver output (same ship as the other motors) is dead
I hope it can help someone else, because volvo asked me for 815 euros to replace the dvd player/gps ;)… and i did it with elbow grease, jedi mind tricks and 30 bucks (1.5+5.5 + shipment costs)
stefano says:
Hi, thank you for your guide, it’s very clear. I’m looking for a new laser unit but I don’t know any online shop in Italy
Could you suggest me the shop in which you bought the laser unit? Thanks and regard