
If the powered aerial on your first generation Volvo S40 is not working or if it’s damaged, follow this tutorial on how to remove it from the car.
Although this aerials can be repaired by replacing the mast or the gear strip, in my case, I was able to source a used one from a scrapped car for a good price, making it easier and cheaper to just replace it.
Tutorial Average Time: 45 min
Tools
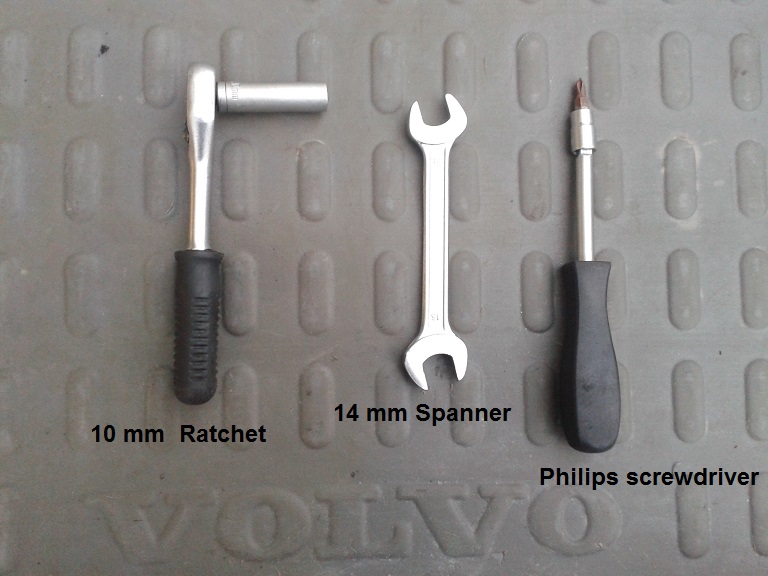
To remove the electrical aerial, you’ll need the following tools:
– 14mm spanner
– 10mm ratchet or spanner
– medium size philips screwdriver
Step 1

Picture 2
Start by removing the rubber in the lower section of the boot, pulling it carefully.
Then remove the plastic that surrounds the lock. This piece is only engaged by springs, and to remove it, you should pull it firmly from the base up.
Step 2

Picture 3
Remove the boot carpet from the car, loosening the screws marked with the red arrows on the picture.
(Note: This is not a mandatory step, but it makes the job easier.)
Step 3
Now, it’s time to remove the left side boot carpet.
It is attached by 4 plastic pins, market with the red arrows in the picture on the right.
To remove the pins marked with “A”, you should unscrew the center of the pin with the philips screwdriver, and then, pull the rest of the pin out.
To remove the pin market with “B”, you just need to pull it out.
After the removal of these pins, you should be able to move the carpet to the center of the boot, gaining access to the aerial (Picture 5).

Picture 5
Picture 6
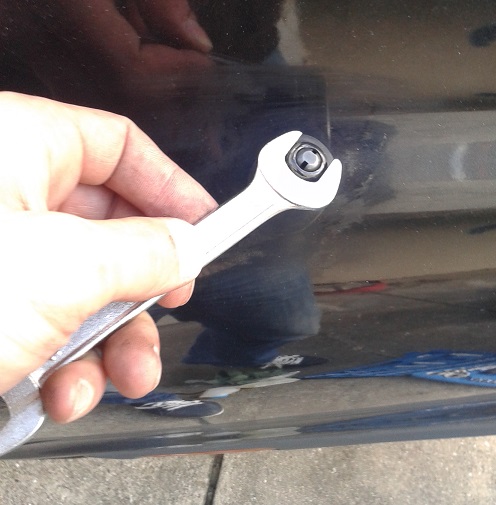
Step 4
With the 14mm spanner, remove the external nut that’s holding the aerial (Picture 6).
Try not to remove the rubber that’s arround the aerial, as this is usually not in perfect condition, and when removed, it’s not easy to make it seal perfect again.
Picture 7
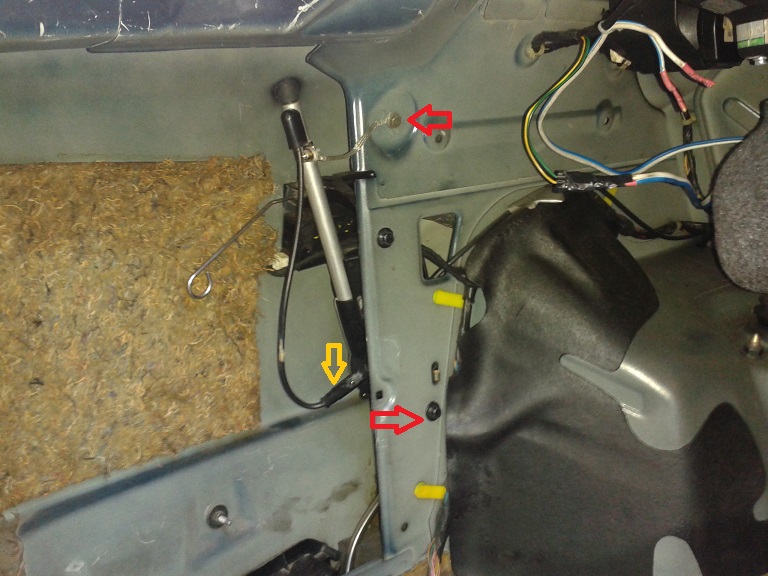
Step 5
Now, back to the boot.
With the 10mm ratchet, you’ll need to remove two screws (marked with red in Picture 7).
Be carefull after you take out the lower screw, because the aerial will come loose.
It’s also time to disconnect the antenna cable plug (marked with yellow in Picture 7).
Step 6
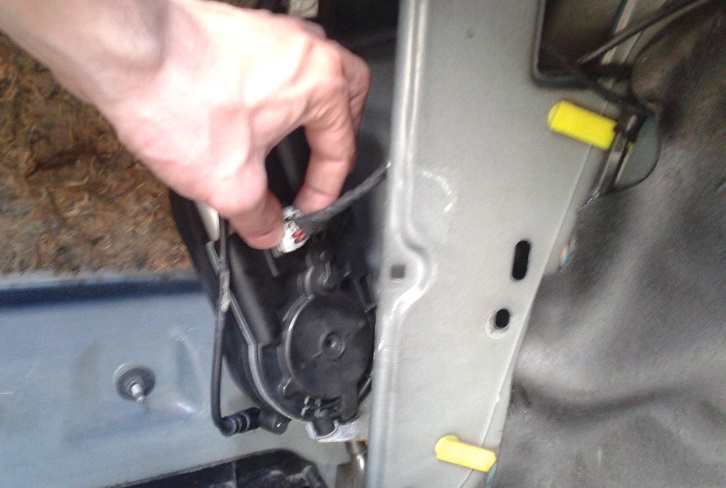
Picture 8
Finally, the antenna is loose.
Just remove the white plug which is connected to the antenna body, and disconnect the water drainage tube.
The drain tube must be disconnected from the car side.
Check carefully how it is connected to the rubber of the car.
When installing back the new aerial you dont want to fail at this point, otherwise the water will leak in and accumulate on the side of the boot.
Installation
To install the new aerial, just reverse the procedure.
Before you put the left side carpet back on it’s place, make sure that:
- you have connected both the white plug into the aerial body and the black antenna cable plug,
- you haven’t disconnected the white plug from the fuel filling port releasing mechanism,
- there isn’t any water leakage to the interior by the aerial external rubber.
Maintenance of your electric aerial
To make sure that your new aerial will last long, you should lubrificate the antenna mast every couple of months, with some lubrificant spray.
The instructions in this tutorial will work in the following models / years:
– 1995, 1996, 1997, 1998, 1999, 2000, 2001, 2002, 2003 and 2004 Volvo S40
Ed says:
Superbly detailed instructions, thanks for the time, patience and effort.
George says:
Excellent instructions. Nothing to add. Thank you